Handling Images with Microsoft Access

What is the best way to store image files in MS Access?
This has to be one of the most frequently asked questions in relation to Access. In actual fact, there are three main techniques available to handle image files in tables with MS Access and these are:
- Store the image in an OLE field and use a bound object frame to display the image.
- Store the path to the image in a text field, using an image control to display the image.
- Store the image as a binary large object bitmap (BLOB) in an OLE field, extract the image when required and use an image control to display the image.
Each technique has advantages and disadvantages. However, the first technique is by far the most problematic as judged by the number of newsgroup posts complaining about OLE (Object Linking and Embedding) server errors (this is the application which is used to display the image e.g. MS Paint) and numerous other problems displaying the images.
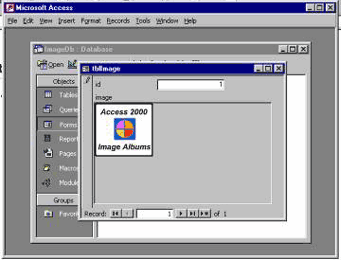
Another often cited complaint regarding this technique concerns the increase in the database size, resulting from storing images in this way due to the fact that Access creates and stores a bitmap version of the image as well. For example, I created an MS Access 2000 mdb with a single table consisting of two fields; "id" (an auto number field) and "image" (an OLE field). I then used the Access form wizard to create a single form, which allows images to be added and displayed.
Figure 1 shows a screenshot of the form created by the wizard. The overall size of the mdb was 124kb without any images. Next, I opened a 4kb gif in Internet Explorer and placed the mouse over the image and selected "copy" from the pop-up menu. After opening the database form and pasting the image into the object frame, I compacted and closed the database and rechecked the mdb file size, which was now 156b. A size increase of 32kb may not sound much but take into consideration the fact that the original image was only 4kb and also consider the overall increase in size when adding a large number of images. This technique takes minutes to set up and can be accomplished without writing any code, but it is really only feasible in situations where a relatively small number of images need to be stored.

Figure 1
The second technique is generally regarded as the preferred technique and is fairly easy to implement. The path to the image is stored in a text field and the image is displayed using a standard image control. All that has to be done is to set the image control's "picture" property to the path that we stored, which can be achieved using VBA. This technique keeps the database size to a minimum, increasing the overall performance of the application.
To make this system more user friendly I would recommend that the "file open" dialog (see "Further Help" below for more details) be used to allow the user to browse to an image rather than laboriously entering the path. One disadvantage of using this technique comes to light when using continuous forms in Access. Unfortunately when we set the image control's "picture" property to the path that we stored on a continuous form it becomes apparent that we are unable to distinguish between each individual image control and we find that the same image is displayed for each record.
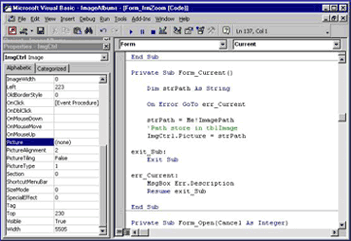
The easiest way around this is to use single forms only and to update the image control's "picture" property when browsing to the next/previous image (you could use the form's "Form_Current" event to accomplish this - see the listing in Figure 2). Another disadvantage with this technique is that the images cannot be password protected in situations where they need to be stored securely as the images are not stored inside the database file.

Figure 2
The final technique can be tricky to set up but has the advantage of storing images inside the database, meaning that password protection is possible and also avoids the bloat associated with the first technique, as the images are stored reflecting their true size. For this technique I would again recommend using the "file open" dialog, allowing the user to browse to an image. We can use either DAO or ADO (in Access 2000 or 2002) to grab the image file and read it into the OLE field in chunks.
To display the image we have to extract it from the database to a temporary file and like the second technique, use an image control to display it by setting the control's "picture" property to the path of the temporary file. Once we are finished with the temporary file we can use the VBA "kill" command to delete it. Unfortunately, as with the second technique, the same problem with Access continuous forms exists.
If displaying the images using single forms is not adequate you could take the time to create a customized form to display more than one individual image, although unfortunately this task is made awkward by the fact that Access does not support control arrays. In addition, this technique also incurs a marginal overhead when compared to the second, as the image files first have to be extracted from the database before we can view them.
On a final note, of the three techniques discussed, I prefer to use the last technique as the images are neatly stored away inside the database file and we do not have to suffer the bloat associated with the first. For a working example of storing images as binary large object bitmaps (BLOB) in an OLE field, please feel free to download and evaluate my Access Image Albums application.
A free example of storing files in this way using DAO with viewable source code can be found by downloading the getBinary zip file, an Access 97 file that can also be converted to Access 2000 or 2002 depending on which version you are running. All links for the sources, downloads and further help can be found below.
(This article is provided "AS IS" with no warranties or guarantees.)
Sources :
- Storing files as binary large object bitmaps (BLOB) in Access using DAO: MS Knowledge Base Article Q103257
- Storing files binary large object bitmaps (BLOB) in Access using ADO: VB Square Article [No Longer Available]

